Thursday, December 5, 2013

Interactive Earth with Three.js

I have always been amazed by the Small Arms Import/Export Chrome Experiment at http://www.chromeexperiments.com/detail/arms-globe/ -- it combines data visualization (geography and timeline) with an interactive 3D model of the Earth, using the amazing Javascript library Three.js. The code is open source, available on GitHub, and I wanted to adapt part of it to a project I've been working on.

As a first step, I wanted to implement the country selection and highlighting. I tried reading through the source code, but eventually got lost in the morass of details.  Fortunately, I stumbled upon a blog post written by Michael Chang about creating this visualization; read it at http://mflux.tumblr.com/post/28367579774/armstradeviz. There are many great ideas discussed here, in particular about encoding information in images.  Summarizing briefly: to determine the country that is clicked, there is a grayscale image in the background, with each country colored a unique shade of gray. Determine the gray value (0-255) of the pixel that was clicked and the corresponding country can be identified by a table lookup. (This technique is also mentioned at well-formed-data.net.) The highlighting feature is similarly cleverly implemented: a second image, stored as a canvas element with dimensions 256 pixels by 1 pixel, contains the colors that will correspond to each country. The country corresponding to the value X in the previously mentioned table lookup will be rendered with the color of the pixel on the canvas at position (X,0). A shader is used to make this substitution and color each country appropriately. When a mouse click is detected, the canvas image is recolored as necessary; if the country corresponding to value X is clicked, the canvas pixel at (X,0) is changed to the highlight color, all other pixels are changed to the default color (black).

For aesthetic reasons, I also decided to blend in a satellite image of Earth. Doing this with shaders is straightforward: one includes an additional texture and then mixes the color (vec4) values in the desired ratio in the fragment shader. However, the grayscale image that Chang uses is slightly offset and somehow differently projected from standard Earth images, which typically place the longitude of 180 degrees aligned with the left border of the image.  So I did some image editing, using the satellite image as the base layer and Chang's grayscale image as a secondary translucent layer, then I attempted to cut and paste and move and redraw parts of the grayscale image so that they lined up. The results are far from pixel perfect, but adequate for my purposes. (If anyone reading this knows of a source for a more exact/professional such image, could you drop me a line? Either stemkoski@gmail or @ProfStemkoski on Twitter.) Then I used an edge detection filter to produce an image consisting of outlined countries, and also blended that into the final result in the fragment shader code. The result:


The code discussed above is available online at http://stemkoski.github.io/Three.js/Country-Select-Highlight.html.

More posts to follow on this project...

Happy coding!

Friday, July 5, 2013

Shaders in Three.js: glow and halo effects revisited

While updating my collection of Three.js examples to v58 of Three.js, I decided to clean up some old code.  In particular, I hoped that the selective glow and atmosphere examples could be simplified - removing the need for blending the results of a secondary scene - by using shaders more cleverly.  I posted a question at StackOverflow, and as it often happens, the process of writing the question as clearly as possible for an audience other than myself, helped to clarify the issue.  The biggest hint came from a post at John Chapman's Graphics blog:
The edges ... need to be softened somehow, and that's where the vertex normals come in. We can use the dot product of the view space normal ... with the view vector ... as a metric describing how how near to the edge ... the current fragment is.
Linear algebra is amazingly useful.  Typically, for those faces that appear (with respect to the viewer) to be near the center of the mesh, the normal of the face will point in nearly the same direction as the "view vector" -- the vector from the camera to the face -- and then the dot product of the normalized vectors will be approximately equal to 1.  For those faces that appear to be on the edge as viewed from the camera, their normal vectors will be perpendicular to the view vector, resulting in a dot product approximately equal to 0.  Then we just need to adjust the intensity/color/opacity of the material based on the value of this dot product, and voila! we have a material whose appearance looks the same (from the point of view of the camera) no matter where the object or camera is, which is the basis of the glow effect. (The glow shouldn't look different as we rotate or pan around the object.)  By adjusting some parameters, we can produce an "inner glow" effect, a "halo" or "atmospheric" effect, or a "shell" or "surrounding force field" effect.  To see the demo in action, check out http://stemkoski.github.io/Three.js/Shader-Glow.html.


In particular, click on the information button in the top left and adjust the values as recommended (or however you like) to see some of the possible effects.

Happy coding!


Sunday, June 23, 2013

Creating a particle effects engine in Javascript and Three.js

A particle engine (or particle system) is a technique from computer graphics that uses a large number of small images that can be used to render special effects such as fire, smoke, stars, snow, or fireworks.

Image of Particle Engine Example
Video of Particle Engine Examples
http://www.youtube.com/watch?v=gtr5QLu9RaI

The engine we will describe consists of two main components: the particles themselves and the emitter that controls the creation of the particles.

Particles typically have the following properties, each of which may change during the existence of the particle:

  • position, velocity, acceleration (each a Vector3)
  • angle, angleVelocity, angleAcceleration (each a floating point number). this controls the angle of rotation of the image used for the particles (since particles will always be drawn facing the camera, only a single number is necessary for each)
  • size of the image used for the particles
  • color of the particle (stored as a Vector3 in HSL format) 
  • opacity - a number between 0 (completely transparent) and 1 (completely opaque)
  • age - a value that stores the number of seconds the particle has been alive
  • alive - true/false - controls whether particle values require updating and particle requires rendering

Particles also often have an associated function that updates these properties based on the amount of time that has passed since the last update.

A simple Tween class can be used to change the values of the size, color, and opacity of the particles.  A Tween contains a sorted array of times [T0, T1, ..., Tn] and an array of corresponding values [V0, V1, ..., Vn], and a function that, at time t, with Ta < t < Tb, returns the value linearly interpolated by the corresponding amount between Va and Vb.  (If t < T0, then V0 is returned, and if t > Tn, then Vn is returned.)

Typically, we never interact with individual particle data directly, rather, we do it through the emitter.

Our emitter will contains the following data:

  • base and spread values for all the particle properties (except age and alive).
    When particles are created, their properties are set to random values in the interval (base - spread / 2, base + spread / 2); particle age is set to 0 and alive status is set to false.
  • enum-type values that determine the shape of the emitter (either rectangular or spherical) and the way in which initial velocities will be specified (also rectangular or spherical)
  • base image to be used for each of the particles, the appearance of which is customized by the particle properties
  • optional Tween values for changing the size, color, and opacity values
  • blending style to be used in rendering the particles, typically either "normal" or additive (which is useful for fire or light-based effects)
  • an array of particles
  • number of particles that should be created per second
  • number of seconds each particle will exist
  • number of seconds the emitter has been active
  • number of seconds until the emitter stops -- for a "burst"-style effect, this value should be close to zero; for a "continuous"-style effect, this value should be large.
  • the maximum number of particles that can exist at any point in time, which is calculated from the number of particles created per second, and the duration of the particles and the emitter  
  • Three.js objects that control the rendering of the particles: a THREE.Geometry, a THREE.ShaderMaterial, and a THREE.ParticleSystem.

 The emitter also contains the following functions:

  • setValues - sets/changes values within the emitter 
  • randomValue and randomVector3 - takes a base value and a spread value and calculates a (uniformly distributed) random value in the range (base - spread / 2, base + spread / 2). These are helper functions for the createParticle function
  • createParticle - initializes a single particle according to parameters set in emitter
  • initializeEngine - initializes all emitter data
  • update - spawns new particles if necessary; updates the particle data for any particles currently existing; removes particles whose age is greater than the maximum particle age and reuses/recycles them if new particles need to created 
  • destroy - stops the emitter and removes all rendered objects
Fortunately, all the graphics processing is handled by Three.js.  There is an object in Three.js called "THREE.ParticleSystem" which allows you to assign an image to individual vertices of a geometry. The appearance of the particles is controller by a "THREE.ShaderMaterial", which requires us to write a custom vertex shader and a custom fragment shader with attributes which take all of our particle properties into account (image, angle, size, color, opacity, visibility) when rendering each particle.

To try out a live demo, go to: http://stemkoski.github.io/Three.js/Particle-Engine.html

Also, feel free to check out the Particle Engine source code, the parameters for the examples in the demo, and how to include the particle engine in a Three.js page.

Happy coding!


Friday, May 31, 2013

Motion Detection and Three.js

This post was inspired by and based upon the work of Romuald Quantin: he has written an excellent demo (play a xylophone using your webcam!) at http://www.soundstep.com/blog/2012/03/22/javascript-motion-detection/ and an in-depth article at http://www.adobe.com/devnet/html5/articles/javascript-motion-detection.html. Basically, I re-implemented his code with a few minor tweaks:

  • The jQuery code was removed.
  • There are two canvases: one containing the video image (flipped horizontally for easier interaction by the viewer), the second canvas containing the superimposed graphics
  • For code readability, there is an array (called "buttons") that contains x/y/width/height information for all the superimposed graphics, used for both the drawImage calls and the getImageData calls when checking regions for sufficient motion to trigger an action.


The first demo is a minimal example which just displays a message when motion is detected in certain regions; no Three.js code appears here.

The second demo incorporates motion detection in a Three.js scene.  When motion is detected over one of three displayed textures, the texture of the spinning cube in the Three.js scene changes to match.

Here is a YouTube video of these demos in action:


Happy coding!

Monday, May 27, 2013

Animated Shaders in Three.js (Part 2)


After my 
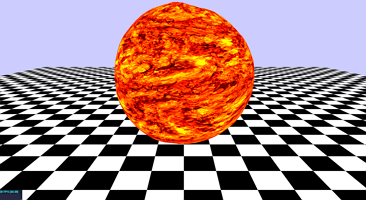
previous post on animated shaders, I decided to build on the shader code to create a more visually sophisticated "fireball effect". This time, my inspiration came from Jaume Sánchez Elias' experiments with perlin noise, particularly his great article on vertex displacement.

In the previous post, we have shader code for animating a "noisy" random distortion of a texture (the "base texture").  The noise is generated from the RGB values of a second texture (the "noise texture").  This time around, we add the following features:

  • allow repeating the textures in each direction (repeatS and repeatT)
  • a second texture (the "blend texture") that is randomly distorted (at a different rate) and then additively blended with the base texture; we also pass in a float that controls the speed of distortion (blendSpeed) and a float value (blendOffset) that is subtracted from the pixel data so that darker parts of the blend texture may result in decreasing values in the base texture
  • randomly distort the positions of the vertices of the sphere using another texture (the "bump texture"); the rate at which these distortions change is controlled by a float value (bumpSpeed) and the magnitude is controlled by a second float value (bumpScale).


Causing the texture to repeat and blending in the color values takes place in the fragment shader, as follows:

<script id="fragmentShader" type="x-shader/x-vertex">
uniform sampler2D baseTexture;
uniform float baseSpeed;
uniform float repeatS;
uniform float repeatT;

uniform sampler2D noiseTexture;
uniform float noiseScale;

uniform sampler2D blendTexture;
uniform float blendSpeed;
uniform float blendOffset;

uniform float time;
uniform float alpha;

varying vec2 vUv;

void main()
{
    vec2 uvTimeShift = vUv + vec2( -0.7, 1.5 ) * time * baseSpeed;
    vec4 noise = texture2D( noiseTexture, uvTimeShift );
    vec2 uvNoiseTimeShift = vUv + noiseScale * vec2( noise.r, noise.b );
    vec4 baseColor = texture2D( baseTexture, uvNoiseTimeShift * vec2(repeatS, repeatT) );

    vec2 uvTimeShift2 = vUv + vec2( 1.3, -1.7 ) * time * blendSpeed;
    vec4 noise2 = texture2D( noiseTexture, uvTimeShift2 );
    vec2 uvNoiseTimeShift2 = vUv + noiseScale * vec2( noise2.g, noise2.b );
    vec4 blendColor = texture2D( blendTexture, uvNoiseTimeShift2 * vec2(repeatS, repeatT) ) - blendOffset * vec4(1.0, 1.0, 1.0, 1.0);

    vec4 theColor = baseColor + blendColor;
    theColor.a = alpha;
    gl_FragColor = theColor;
}
</script>

The bump mapping occurs in the vertex shader.  Bump mapping is fairly straightforward -- see the article above for an explanation; the key code snippet is:
vec4 newPosition = position + normal * displacement
However, there are two particularly interesting points in the code below:

  1. Using time-shifted UV coordinates seems to create a "rippling" effect in the bump heights, while using the noisy-time-shifted UV coordinates seems to create more of a "shivering" effect.
  2. There is a problem at the poles of the sphere -- the displacement needs to be the same for all vertices at the north pole and south pole, otherwise a tearing effect (a "jagged hole") appears, as illustrated at StackOverflow (and solved by WestLangley).  This is the reason for the conditional operator  that appears in the assignment of the distortion (and introduces not-so-random fluctuations at the poles).

Without further ado, The code for the new and improved vertex shader is:

<script id="vertexShader" type="x-shader/x-vertex">
uniform sampler2D noiseTexture;
uniform float noiseScale;

uniform sampler2D bumpTexture;
uniform float bumpSpeed;
uniform float bumpScale;

uniform float time;

varying vec2 vUv;

void main()
{
    vUv = uv;

    vec2 uvTimeShift = vUv + vec2( 1.1, 1.9 ) * time * bumpSpeed;
    vec4 noise = texture2D( noiseTexture, uvTimeShift );
    vec2 uvNoiseTimeShift = vUv + noiseScale * vec2( noise.r, noise.g );
    // below, using uvTimeShift seems to result in more of a "rippling" effect
    //   while uvNoiseTimeShift seems to result in more of a "shivering" effect
    vec4 bumpData = texture2D( bumpTexture, uvTimeShift );

    // move the position along the normal
    //  but displace the vertices at the poles by the same amount
    float displacement = ( vUv.y > 0.999 || vUv.y < 0.001 ) ?
    bumpScale * (0.3 + 0.02 * sin(time)) :
    bumpScale * bumpData.r;
    vec3 newPosition = position + normal * displacement;

    gl_Position = projectionMatrix * modelViewMatrix * vec4( newPosition, 1.0 );
}
</script>

The code for integrating these shaders into Three.js:

// base image texture for mesh
var lavaTexture = new THREE.ImageUtils.loadTexture( 'images/lava.jpg');
lavaTexture.wrapS = lavaTexture.wrapT = THREE.RepeatWrapping;
// multiplier for distortion speed 
var baseSpeed = 0.02;
// number of times to repeat texture in each direction
var repeatS = repeatT = 4.0;

// texture used to generate "randomness", distort all other textures
var noiseTexture = new THREE.ImageUtils.loadTexture( 'images/cloud.png' );
noiseTexture.wrapS = noiseTexture.wrapT = THREE.RepeatWrapping;
// magnitude of noise effect
var noiseScale = 0.5;

// texture to additively blend with base image texture
var blendTexture = new THREE.ImageUtils.loadTexture( 'images/lava.jpg' );
blendTexture.wrapS = blendTexture.wrapT = THREE.RepeatWrapping;
// multiplier for distortion speed
var blendSpeed = 0.01;
// adjust lightness/darkness of blended texture
var blendOffset = 0.25;

// texture to determine normal displacement
var bumpTexture = noiseTexture;
bumpTexture.wrapS = bumpTexture.wrapT = THREE.RepeatWrapping;
// multiplier for distortion speed 
var bumpSpeed   = 0.15;
// magnitude of normal displacement
var bumpScale   = 40.0;

// use "this." to create global object
this.customUniforms = {
    baseTexture:  { type: "t", value: lavaTexture },
    baseSpeed:    { type: "f", value: baseSpeed },
    repeatS:      { type: "f", value: repeatS },
    repeatT:      { type: "f", value: repeatT },
    noiseTexture: { type: "t", value: noiseTexture },
    noiseScale:   { type: "f", value: noiseScale },
    blendTexture: { type: "t", value: blendTexture },
    blendSpeed:   { type: "f", value: blendSpeed },
    blendOffset:  { type: "f", value: blendOffset },
    bumpTexture:  { type: "t", value: bumpTexture },
    bumpSpeed:    { type: "f", value: bumpSpeed },
    bumpScale:    { type: "f", value: bumpScale },
    alpha:        { type: "f", value: 1.0 },
    time:         { type: "f", value: 1.0 }
};

// create custom material from the shader code above
//   that is within specially labeled script tags
var customMaterial = new THREE.ShaderMaterial(
{
    uniforms: customUniforms,
    vertexShader:   document.getElementById( 'vertexShader'   ).textContent,
    fragmentShader: document.getElementById( 'fragmentShader' ).textContent
}   );

var ballGeometry = new THREE.SphereGeometry( 60, 64, 64 );
var ball = new THREE.Mesh( ballGeometry, customMaterial );
scene.add( ball );

For a live example, check out the demo in my GitHub collection, which uses this shader to create an animated fireball.


Happy coding!

Saturday, May 25, 2013

Animated Shaders in Three.js

Once again I have been investigating Shaders in Three.js.  My last post on this topic was inspired by glow effects; this time, my inspiration comes from the Three.js lava shader and Altered Qualia's WebGL shader fireball.


For these examples, I'm really only interested in changing the pixel colors, so I'll just worry about the fragment shader.

The Three.js (v.56) code  for the a simple fragment shader that just displays a texture would be:
<script id="fragmentShader" type="x-shader/x-vertex">
uniform sampler2D texture1;
varying vec2 vUv;
void main() 
{
    vec4 baseColor  = texture2D( texture1, vUv );
    gl_FragColor = baseColor;
} 
</script>

(note that this code is contained within its own script tags.)

Then to create the material in the initialization of the Three.js code:
var lavaTexture = new THREE.ImageUtils.loadTexture( 'images/lava.jpg' );
lavaTexture.wrapS = lavaTexture.wrapT = THREE.RepeatWrapping; 

var customUniforms = { texture1: { type: "t", value: lavaTexture }   };

// create custom material from the shader code above within specially labeled script tags
var customMaterial = new THREE.ShaderMaterial( 
{
    uniforms: customUniforms,
    vertexShader:   document.getElementById( 'vertexShader'   ).textContent,
    fragmentShader: document.getElementById( 'fragmentShader' ).textContent
}   );

What we would like to create a more realistic effect is to:
  • add a bit of "random noise" to the texture coordinates vector (vUv) to cause distortion
  • change the values of the random noise so that the distortions in the image change fluidly
  • (optional) add support for transparency (custom alpha values)
To accomplish this, we can add some additional parameters to the shader, namely:
  • a second texture (noiseTexture) to generate "noise values"; for instance, we can add the red/green values at a given pixel to the x and y coordinates of vUv, causing an offset
  • a float (noiseScale) to scale the effects of the "noise values"  
  • a float (time) to pass a "time" value to the shader to continuously shift the texture used to generate noise values
  • a float (baseSpeed) to scale the effects of the time to either speed up or slow down rate of distortions in the base texture
  • a float (alpha) to set the transparency amount
The new version of the fragment shader code looks like this:
<script id="fragmentShader" type="x-shader/x-vertex"> 
uniform sampler2D baseTexture;
uniform float baseSpeed;
uniform sampler2D noiseTexture;
uniform float noiseScale;
uniform float alpha;
uniform float time;
varying vec2 vUv;

void main() 
{
    vec2 uvTimeShift = vUv + vec2( -0.7, 1.5 ) * time * baseSpeed;
    vec4 noise = texture2D( noiseTexture, uvTimeShift );
    vec2 uvNoisyTimeShift = vUv + noiseScale * vec2( noise.r, noise.g );
    vec4 baseColor = texture2D( baseTexture, uvNoisyTimeShift );
    baseColor.a = alpha;
    gl_FragColor = baseColor;
}
</script>

The new code to create this shader in Three.js:
// initialize a global clock to keep track of time
this.clock = new THREE.Clock();

var noiseTexture = new THREE.ImageUtils.loadTexture( 'images/noise.jpg' );
noiseTexture.wrapS = noiseTexture.wrapT = THREE.RepeatWrapping;

var lavaTexture = new THREE.ImageUtils.loadTexture( 'images/lava.jpg' );
lavaTexture.wrapS = lavaTexture.wrapT = THREE.RepeatWrapping; 

// create global uniforms object so its accessible in update method
this.customUniforms = {
    baseTexture:  { type: "t", value: lavaTexture },
    baseSpeed:    { type: "f", value: 0.05 },
    noiseTexture: { type: "t", value: noiseTexture },
    noiseScale:   { type: "f", value: 0.5337 },
    alpha:        { type: "f", value: 1.0 },
    time:         { type: "f", value: 1.0 }
}

// create custom material from the shader code above within specially labeled script tags
var customMaterial = new THREE.ShaderMaterial( 
{
    uniforms: customUniforms,
    vertexShader:   document.getElementById( 'vertexShader'   ).textContent,
    fragmentShader: document.getElementById( 'fragmentShader' ).textContent
}   );

and in the update or render method, don't forget to update the time using something like:
var delta = clock.getDelta();
customUniforms.time.value += delta;

That's about it -- for a live example, check out the demo in my GitHub collection, which uses this shader to create an animated lava-style texture and animated water-style texture.


Happy coding!

Saturday, March 16, 2013

Using Shaders and Selective Glow Effects in Three.js

When I first started working with Three.js, in addition to the awe-inspiring collection of examples from Mr.doob, I was also dazzled by the "glow examples" of Thibaut Despoulain: the glowing Tron disk, the animated glowing Tron disk (with accompanying blog post), the Tron disk with particles, and more recently, the volumetric light approximation (with accompanying blog post).  At the time, I didn't know anything about shaders (although there were some excellent tutorials at Aerotwist, part 1 and part 2).

Recently, I learned about the Interactive 3D Graphics course being offered (for free!) at Udacity, that teaches participants all about Three.js. This course is taught by Eric Haines (Google+, Blog), who has written the excellent book Real-Time Rendering.  Eric stumbled across my own collection of introductory examples for Three.js, and recommended a really great article about an introduction to pixel shaders in Three.js  (a.k.a. fragment shaders) by Felix Turner at Airtight Interactive. This motivated me to do two things: (1) sign up for the Udacity course (which is really excellent, and highly recommended!), and (2) to update my collection of Three.js examples for the latest release of Three.js (version 56 at the time of writing).

While updating, I noticed that a number of new classes had been created for shaders and post-processing effects, and so I spent a lot of time looking through source code and examples, and eventually created two new demos of my own: a minimal example of using a Three.js pixel shader, and a shader explorer, which lets you see the results of applying a variety of the Three.js shaders (sepia, vignette, dot screen, bloom, and blur) and the effects of changing the values of their parameters.

Inspired, I revisited the glowing Tron disk examples, hoping to use the BlendShader.js now included as part of the Three.js github repo.  Alas, the search term "THREE.BlendShader" is almost a Googlewhack, with only two results appearing (at the time of writing, which will hopefully change soon); using these links as a starting point, I found a nice example of using the BlendShader to create a neat motion blur effect on a spinning cube.

Next came some experimentation to implement the approach described by Thibaut above, which requires the creation of two scenes to achieve the glow effect.  The first is the "base scene"; the second contains copies of the base scene objects with either bright textures (for the objects that will glow) or black textures (for nonglowing objects, so that they will block the glowing effect properly in the combined scene). The secondary scene is blurred and then blended with the base scene.  However, BlendShader.js creates a linear combination of the pixels from each image, and this implementation of the glow effect requires additive blending.  So I wrote AdditiveBlendShader.js, which is one of the simplest shaders to write, as you are literally adding together the two color values at the pixels of the two textures you are combining.  The result (with thoroughly commented code) can be viewed here:


Hopefully other Three.js enthusiasts will find this example helpful!